Admin Guide / Integrations / Salesforce
Configuring Salesforce Integration + Writeback
Set up your Salesforce connection, permissions, field mappings, and automatic writeback.
Rox periodically pulls Salesforce data into a managed warehouse. The integration user's permissions determine which data Rox can access. An Organization Admin configures the fields and activities Rox writes back.
Complete the setup in three stages: prepare the Salesforce integration user, complete onboarding in Rox, then manage mappings and activity writeback in Settings → Integrations → Salesforce. Test sync is available during onboarding only.
Before you begin
You need:
A Rox Organization Admin to complete setup in Rox.
A Salesforce administrator who can manage users, licenses, and permission sets.
A Salesforce user with API access enabled. Use a dedicated integration user so Rox activity is easy to audit.
For the simplest setup, use a dedicated user with a full Salesforce license and the System Administrator profile. For restricted access, configure a custom permission set before connecting.
Activity writeback requires a full Salesforce license under the setup described here. The API-only Salesforce Integration license is supported for read sync or core entity writeback, but not activity writeback.
Create or confirm the integration user
In Salesforce, go to Setup → Administration → Users → Users.
Create a dedicated integration user or select the user you will connect.
Use the Salesforce license if you need activity writeback.
Assign the System Administrator profile for the full-access setup, or configure the restricted permissions below.
Complete the user's account details and confirm API Enabled is selected.


Objects and required fields
Rox supports Account, Contact, Lead, Opportunity, Opportunity Contact Role, Opportunity Stage, Campaign, and Campaign Member. Rox also syncs User and Task data to support functionality such as account assignment and activity writeback.
During onboarding, map Salesforce fields to the corresponding Rox fields. After onboarding, use CRM Mappings to add custom mappings.

General Settings
For each object you sync, the integration user needs Read access to the object and its required fields.
Object | Required fields |
|---|---|
Account (Required) |
|
Contact (Optional) |
|
Lead (Optional) |
|
Opportunity (Optional) |
|
Opportunity Contact Role (Optional, recommended if syncing Opportunity) |
|
Opportunity Stage (Optional, recommended if syncing Opportunity) |
|
Campaign (Optional) |
|
Campaign Member (Optional, recommended if syncing Campaign) |
|
Additional fields, such as industry, revenue, contact phone numbers, and opportunity amounts, can be mapped according to your team's needs.
Restrict access before connecting
Skip this section if you are using the System Administrator profile.
Create or configure a custom permission set for the integration user. Grant Read access to the objects and fields Rox should sync, including the required fields above. Check Salesforce sharing rules so the intended records are visible to that user.
Grant write permissions only for the objects and fields you intend Rox to create or update. Read sync and writeback require different permissions; configuring read access alone does not enable writeback.
Use the permissions for the actual integration user. If you need activity writeback, use the full Salesforce license described above. Complete the additional activity permissions in Enable writeback.
Validate the setup by confirming that the integration user can query the intended objects and fields.
Step 1 Connect Salesforce and Fivetran
Sign in to Rox as an Organization Admin.
Go to Settings → Integrations.
Find Salesforce and select Connect, or Action Required if shown.

Confirm your Salesforce edition and the integration user's permissions.
Select Continue, then sign in to Salesforce as the integration user.

After returning to Rox, select Connect Fivetran.
In Fivetran, select Continue, Authorize, then Save and Test. Use the same Salesforce credentials and custom domain, if applicable.


Authorize Fivetran

Save, Test, and Finalize Fivetran Connection
Continue to Select objects.
Fivetran ingests Salesforce data into the warehouse used by Rox.
For a sandbox connection, choose Log In with a Different Username, select Use Custom Domain, enter the Salesforce custom domain, and continue.
Step 2 Select objects
Select the Salesforce objects your team needs, such as Contact, Lead, and Opportunity. Account and User are required.
You can enable additional objects after onboarding in Settings.

Step 3 Configure field mappings
Select an object tab.
Review the default Salesforce-to-Rox mappings.
Select the appropriate Salesforce field for each Rox field.
Keep required mappings in place and adjust optional mappings as needed.
Continue to Account assignment.

After onboarding, use CRM Mappings to create or refine custom mappings.
Step 4 Configure account assignment
Account assignment determines which Salesforce Accounts each Rox user can access.
Review the assignment rule for each user.
On Owner fields, select the Salesforce Account-to-User fields used to assign Accounts. Most organizations use Account Owner; select a supported custom owner field if needed.
On Account filters, optionally configure an additional filter. A user can have multiple owner fields and one additional filter.
On Default rule, configure the rule for users without owner fields or filters.
Use Preview to check the resulting Account set, then save.
Users without a matching assignment rule do not see Accounts. Continue to Enable writeback, or go to Test sync if you do not need writeback.

After onboarding, update rules in Settings → Integrations → Salesforce → Account Assignment.
Step 5 Enable writeback
Writeback is optional. Rox writes only the fields and activities configured by an Organization Admin and permitted by the Salesforce integration user's access.
Install the managed package
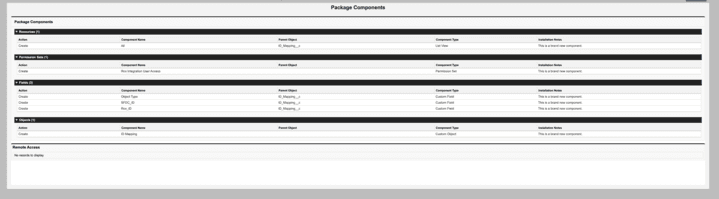
Install the Rox managed package. Select Install for All Users, then Install.
The package creates:
ID Mapping (
RoxAI__ID_Mapping__c), which resolves Rox and Salesforce entities during bidirectional sync.Rox Integration User Access, a permission set that grants access to the ID Mapping object.

Install the Rox Managed Package
Configure write permissions
If the integration user has a full Salesforce license and the System Administrator profile, Salesforce-side permission setup is complete. Continue with the Rox-side mappings and activity configuration after onboarding.
For a restricted integration user:
Assign Rox Integration User Access.
In your custom permission set, grant the object and field access needed for the records Rox should create or update.
Assign the custom permission set to the integration user.
For activity writeback, also configure:
Access Activities, Edit Tasks, and Edit Events in System Permissions.
The Task permissions needed by the integration, including the documented Create, Edit, and Delete Tasks permissions.
Access to the Task and Event objects and the activity fields Rox uses.
Review access to these Task fields: Subject, Description, Status, ActivityDate, OwnerId, WhoId, WhatId, Type, TaskSubtype, Priority, CallType, and CallDisposition. Grant write access to fields Rox must populate where Salesforce allows it.
Wait for the next sync, which may take about 30 minutes, then confirm that the intended fields are write-enabled in CRM Mappings.


For integrations connected before May 31, 2025, re-authenticate after granting write permissions. See Re-authenticate Salesforce and Fivetran.
Step 6 Test sync
Run Test sync.
Review errors or warnings and return to the relevant onboarding step to correct them.
When the test succeeds, select Submit to finalize the connection.

After onboarding, configure the writeback mappings and activity types your team needs.
Use Salesforce lists in People
After your organization’s Salesforce connection is configured, users can write selected Lead and Contact list values back to Salesforce through that connection. A personal Salesforce connection is not required for selected-row writeback.
To import their own Salesforce Lead and Contact list views into People, users must connect a personal Salesforce account in Rox’s integration settings. This supplements the organization connection and does not replace organization onboarding.
See Import Salesforce list views and Write Leads and Contacts to Salesforce for instructions.
See Import Salesforce list views and Write Leads and Contacts to Salesforce for instructions.
Manage CRM Mappings
After the first sync, go to Settings → Integrations → Salesforce.
CRM Mappings includes Accounts, Contacts, Opportunities, Leads, and Activities. Configure settings and mappings for each object.
For Contacts and Leads:
Mapping section | Purpose |
|---|---|
Read | Maps Salesforce fields into Rox during sync. |
Write (Activity) | Configures fields used when writing activities and creating Salesforce Contacts or Leads referenced by a Rox activity. |
Enable writeback for new entities only after completing the managed-package and permissions setup.

Configure Write Activity mappings
Add a custom mapping
Select + Add Mapping to create a custom Rox field for the entity type.
Set its name, compatible data type, access controls, and visibility.
Make the field Editable in Rox and Organization-Wide.
Under Inactive Fields, select the Salesforce custom field and the new Rox field.
Choose the applicable Read or Write sync rule.
The new field appears under Custom Rox Fields. Confirm that the selected Rox data type supports the Salesforce field before saving the mapping.

Formula fields
Changes to a calculated value may not update the Salesforce record's modification timestamp, so an incremental sync may not pick up the change.
If you need these values synced reliably, have your Salesforce administrator configure automation to copy the calculated value into a stored field and keep it current. Design the automation around the formula's dependencies, then map the stored field in Rox. For new Salesforce automation, use Flow Builder rather than Process Builder or Workflow Rules.
Configure activity writeback
After onboarding and permission setup, open the activity writeback configuration in Settings → Integrations → Salesforce.
Configure the activity types your team wants Rox to write to Salesforce:
Email Writeback
Phone Call Writeback
LinkedIn Message Writeback
LinkedIn Connection Writeback
Map activity types to Salesforce values
For each Rox activity type, select the values Rox should write to the existing Salesforce Task Type and Task Subtype fields. These settings control how activities created by Rox are categorized in Salesforce.
Rox loads the available picklist values from Salesforce. The selected values do not need to have the same names as Rox’s activity types. For example, a Rox Phone Call activity could map to a Salesforce Type of Outbound Call and a Task Subtype of Call, provided those values are available in your Salesforce configuration.
Type and Task Subtype support different customization. Task Subtype (TaskSubtype) is a restricted picklist managed by Salesforce with a limited, predefined set of values. You cannot add custom subtype values. If you need a custom activity category, such as LinkedIn Outreach, add it to the Salesforce Task Type picklist, refresh the Salesforce field metadata in Rox, and select it in the Type mapping. For Task Subtype, choose an appropriate existing Salesforce value.
Choose from the available Salesforce values for both restricted and unrestricted picklists. If the value you need is missing:
Ask your Salesforce administrator to confirm that it is active and available to the integration user.
If the field supports custom values, have your administrator add the desired value in Salesforce.
Refresh the Salesforce field metadata in Rox, then select the value.
Salesforce controls which values each field supports. You do not need to create a new Salesforce field or rename Salesforce values to match Rox’s activity types.
Use Mark Rox-created Activities to write the word Rox to the selected Salesforce Task field.

Use Additional Mappings to translate other activity field values into values accepted by your Salesforce configuration. These mappings must satisfy the destination field’s picklist constraints and any Salesforce validation rules.

Configure engagement status writeback
Rox can update a Salesforce Contact or Lead field based on sequence engagement. Contact and Lead writeback are configured separately.
Go to Settings → Integrations → Salesforce → Write.
Find the Contact stage card.
Select the Salesforce field Rox should update. Only fields available for writeback appear.
Select Map values and choose a destination value for every Rox stage. The writeback switch remains disabled until every stage has a value.
Enable Contact stage writeback.
Repeat these steps in the Lead stage card if needed.
Not Started is written when a person is added to a sequence. Subsequent updates reflect the latest sequence’s stage. See Engagement Status Writeback in Syncing with Salesforce for the full stage definitions.
Example: track outbound progress in Salesforce
Map Rox stages to Salesforce statuses so your team can track a person from sequence enrollment through a booked meeting.
Rox stage | Example Salesforce status |
|---|---|
Not Started | SDR Accepted |
Active | Working |
Completed | Nurture |
Email replied | Engaged |
LinkedIn replied | Engaged |
Call answered | Connected |
Meeting booked | Meeting Scheduled |
When an SDR adds someone to a sequence, Rox writes SDR Accepted. After the first task is completed, it writes Working. If the person replies by email, it writes Engaged. When a meeting is booked, it writes Meeting Scheduled.
Choose values that match your Salesforce process and are available in the destination field.
Re-authenticate Salesforce and Fivetran
Re-authenticate if the integration requires action, its token has expired or been revoked, or updated permissions require a new authorization.
Go to Settings → Integrations and find Salesforce.
Select the settings icon, regardless of whether the integration shows Error, Action Required, or Ready.
On Authentication, select Re-authenticate and sign in as the integration user.
Return to Rox and refresh if needed.
Select Action Required, then Map Key Values to re-authenticate Fivetran.
Select Re-authorize connection, then Save and Test.
Return to Rox and refresh. Confirm the connection shows Connected.
OAuth approval error
If you see OAUTH_APPROVAL_ERROR_GENERIC, check whether Salesforce is blocking the Rox Connected App. In Salesforce, open Connected Apps OAuth Usage and confirm RoxAI is installed or approved alongside Fivetran, then retry.


How the integration works
Component | Service | Location |
|---|---|---|
Warehouse | Snowflake | United States |
Ingestion | Fivetran | United States |
Rox application frontend | Vercel | United States |
Rox application backend | AWS | United States |
Rox accesses the objects and fields permitted for the Salesforce integration user and configured for sync. Writeback is limited by both Salesforce permissions and the Organization Admin's configuration in Rox.
Synced data supports account research, insights, and opportunity management. Data retention and removal follow Rox's applicable data-lifecycle policies.