Admin Guide / Organization Settings / Single Sign-On & SCIM
SCIM Provisioning
Provision users and synchronize groups from your IdP.
This guide continues from Enterprise SSO via Auth0. With SSO alone, Rox creates users just in time at their first sign-in. With SCIM 2.0, your identity provider creates, updates and deactivates users and syncs groups before anyone signs in. Changes reach Rox within a few minutes. Rox does not push changes back to your IdP.
Available on Enterprise workspaces. Finish the SSO setup through the connection test first.
What SCIM syncs
Data | Behavior |
|---|---|
Set at provisioning. Later email changes in the IdP do not update Rox. | |
Name | Managed in the IdP. Cannot be edited in Rox after provisioning. |
Groups and memberships | Synced |
User lifecycle | Create, update, deactivate |
Roles | Not synced. Managed in Rox. |
Step 1: Open Provisioning in the wizard
After the SSO test passes and you click Done, the wizard shows Configure Your Connection with a green checkmark beside Single Sign-On. Open Provisioning before you click Enable Connection. Keep the wizard open and configure your IdP in another tab.
If you already enabled the connection, go to Rox → Settings → Workspace and click Reconfigure under Single sign-on to return to this screen.

Step 2: Prepare your identity provider
Okta Workspace
Do not assign users or push groups until you enable the connection in Step 4. Enabling the connection establishes the SCIM connection between Okta and Rox. Anything Okta sends before then is not applied.
Use two Okta applications. The SAML Rox app controls sign-in. Rox SCIM controls provisioning. Assign the same users and groups to both after the connection is established (Step 5).
1. Add the SCIM template application from the catalog
Open Applications → Applications → Browse App Catalog in Okta. Search for (OAuth Bearer Token) Governance with SCIM 2.0. Select that integration.
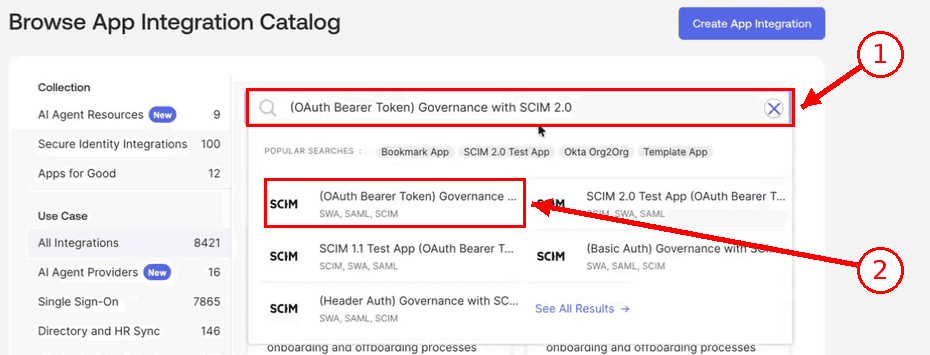
Click Add Integration on the integration page.

2. Name the app and finish adding it
Set Application label to Rox SCIM.
Check Do not display application icon to users. Under Browser plugin auto-submit, leave Automatically log in when user lands on login page unchecked. Click Next.
Open Sign-On Options → Credentials Details. Set Application username format to Okta username. Keep Update application username on set to Create and update. Click Done. This app is for SCIM, not a second SSO connection.
Ensure the SAML Rox application username to Okta username too. Both apps must send the same username: the SAML NameID and the SCIM userName identify the user in Rox, and they must not change. Email can be different.

Microsoft Entra ID
Do not turn on provisioning until you enable the connection in Step 4. Enabling the connection establishes the SCIM connection between Entra ID and Rox. Anything Entra ID sends before then is not applied.
Use the enterprise application already configured for Rox SSO. Do not create another app. Open Provisioning → Get started. Select Connect your application in the interface shown.

Check that Single sign-on → Attributes & Claims → Unique User Identifier (Name ID) uses user.userprincipalname. SCIM sends the same UPN as userName, so a user's sign-in and their provisioned account match. Email (user.mail) can be different from the UPN.
Choose Automatic for Provisioning Mode.

Step 3: Configure provisioning
Copy the SCIM endpoint from Base URL or Provisioning Endpoint URL in the Rox wizard. Generate the bearer token below.
Under Bearer Token, click Generate Token. Click Copy And Close to copy it. The token is not shown again after the dialog closes.


Okta Workspace
1. Configure the API integration
Open Rox SCIM → Provisioning → Integration. Click Configure API Integration. Check Enable API integration. Paste the Rox endpoint into Base URL. Remove any trailing forward slash.

Paste the token into OAuth Bearer Token. Keep Import Groups checked. Click Test API Credentials. After the test succeeds, click Save.

2. Choose what Okta sends
Open Provisioning → To App. Click Edit.

Check Create Users, Update User Attributes, and Deactivate Users only. Keep Sync User Password unchecked.

Click Save.

3. Configure attribute mappings
Open SCIM Mapping in the Rox wizard. In Okta, open Provisioning → To App → Rox SCIM Attribute Mappings. Click X beside each mapping listed below. Confirm each Remove Mapping dialog with OK:
Primary email type (
emailType)Primary phone type (
primaryPhoneType)Address type (
addressType)
Type mappings can cause user update errors in PUT requests.

Go to Profile Editor

[Required] And add a new attribute 'Rox Email' as per this config, as we provision this email in Rox:
Display name |
|
Variable name |
|
External name |
|
External namespace |
|
Attribute required | Yes |
Attribute type | Personal |

Then, go back to your app and under profile attributes, map the new attribute

Map the new roxEmail as shown:
Attribute value: Map from Okta profile -
email | stringApply on: create and update

Check the remaining mappings are present:
Username (
userName): 'configured in Sign On settings' (ensure Okta Username).Display name (
displayName):user.displayName.
In the wizard, skip the Sync Groups step, without assigning or pushing groups yet. Finish the wizard and enable the connection first (Step 4).
Microsoft Entra ID
Open Admin credentials. Select Bearer authentication. Enter:
Tenant URL: The Rox endpoint with
?aadOptscim062020appended.Example:\ Let's say the value you copied from the wizard is
https://roxai.us.auth0.com/scim/v2/connections/con_xxxxxx,\ then, you need to enter thehttps://roxai.us.auth0.com/scim/v2/connections/con_xxxxxx?aadOptscim062020in the Tenant URL
Secret token: The bearer token from the Rox wizard.
Click Test connection. After it succeeds, click Create to save.
Configure attribute mappings
Open Provisioning → Mappings → Provision Microsoft Entra ID Users. Keep Enabled set to Yes. Check these mappings are present:
Entra ID attribute | Rox SCIM attribute | Notes |
|---|---|---|
|
| Matching attribute. Must be the same value as the SAML Name ID. |
|
| The user's email in Rox. |
|
| Deactivates the user in Rox when they are unassigned or disabled. |
|
| |
|
| |
|
|
Keep the default Matching precedence of userName. Keep one mapping for each target attribute.
Click Save. Open Provision Microsoft Entra ID Groups. Keep Enabled set to Yes and keep the default mappings: displayName → displayName, objectId → externalId and members → members. Click Save.
Do not turn on provisioning yet. You turn it on in Step 5, after the connection is established.

Step 4: Enable the connection
Enabling the connection establishes the SCIM connection between your IdP and Rox. From then on, Rox applies the users and groups your IdP sends. Do this before you assign or provision anyone.
Finish the provisioning wizard. Click Done.

On Configure Your Connection, check for green checkmarks beside Single Sign-On and Provisioning. Click Enable Connection at the top right to establish the connection. Wait for completion. Close the wizard.
Before you assign anyone, open Settings → Workspace → Single sign-on in Rox. Confirm SCIM provisioning shows On. This can take a few minutes after you enable the connection. Changes the IdP sends before then are not applied until the next daily sync.

Step 5: Assign users and groups
With the connection established, send users and groups to Rox. In Okta, assign them to Rox SCIM and push groups. In Entra ID, assign them and turn on provisioning.
Before you assign a user, confirm their SAML NameID equals their SCIM
userName(the Okta username, or the UPN in Entra ID). Their email can be different.
Okta Workspace
Open Rox SCIM → Assignments → Assign. Choose Assign to People or Assign to Groups. Use the same assignments as the SAML Rox app. The SSO app grants sign-in access. The SCIM app creates users before their first sign-in.

Complete the user or group assignments. Click Done.

Okta provisions users as soon as they are assigned. If a user does not appear in Rox, open Dashboard → Tasks in Okta, review the failed push, and click Retry.
Check Settings → Members in Rox after a few minutes. A matching email links the existing Rox account instead of creating another.

Push groups
Assignment provisions a group's users, not the Rox group itself. Open Rox SCIM → Push Groups → Push Groups → Find groups by name. Find each assigned group. Keep Push group memberships immediately checked. Click Save. Wait for Active status. For later refreshes, use Refresh App Groups and the group's push controls.

Pushed groups appear in Settings → User groups. Their members must already exist in Rox. If a Rox group has the same name, the pushed group name includes its Okta group ID.
Open the synced group in Settings → User groups to assign its Rox roles.

Microsoft Entra ID
After the connection is established, open Users and groups in the enterprise application. Click Add user/group. Select the users or groups and complete the assignment. Keep any assignments made during SSO setup on this same app.

Start provisioning once
Once users and groups are assigned, open Provisioning in Entra. Set Provisioning Status to On. Click Save once. Do not toggle provisioning for later user or group changes.

Open Overview. Click Start provisioning once. The first cycle creates the assigned users and groups in Rox.

Wait for Initial sync completed under Current cycle status. Review the counts. The example shows two users and one group.

Verify provisioning
Open Settings → Workspace → Single sign-on in Rox. Confirm Connected for the IdP and On for SCIM provisioning. Review the user and group counts. Check the records in Settings → Members and Settings → User groups.

Map groups to roles
New users get Member plus the roles their groups grant. Existing users retain their Rox roles.
Open Settings → User groups in Rox. Select a synced IdP group.

Under Roles this group grants, select the Rox roles. Members get these roles right away. A user who is already signed in must sign out and sign back in to see them in their current session. Users who have not signed in yet get them at their first sign-in. Manage roles in Rox, not the IdP.

Create and rename IdP groups in the IdP. Add and remove their members there too. These actions are not available in Rox.
Open Settings → Members and select a person. Under Assigned roles, direct roles have an Assigned label. Group roles show the granting group's name. User groups lists the roles each group grants. Effective roles combine all direct and group roles.

Removing a direct role does not remove a role still granted by a group. Edit group-granted roles on the group in Rox. Edit group membership in the IdP. Do not edit group-derived roles on the user.

Guide: Manage users and groups
Manage provisioned users in your IdP, not Rox. Rox protects the last Admin from deactivation. Assign another Admin before removing that user.
Okta Workspace
Add or re-provision a user
Assign the user to the SAML Rox app in Okta. Open Rox SCIM → Assignments → Assign → Assign to People. Click Assign beside the user. Review their details. Click Save and Go Back, then Done. Use these steps to provision a previously unassigned user again.
The SSO assignment restores sign-in. The SCIM assignment restores provisioning. Check the account in Settings → Members.

Unassign and deprovision a user
Remove the SAML Rox app assignment to revoke sign-in. Open Rox SCIM → Assignments. Click X beside the user. Confirm Unassign User with OK. If access comes from a group, remove the user from that group instead of removing an individual assignment.
The deactivated user disappears from Settings → Members. If the change has not appeared, open Dashboard → Tasks in Okta, review the failed push, and click Retry. Check again.

Change a name for Rox only
Open Rox SCIM → Assignments. Click the pencil beside the user. Edit Display name. Scroll down and save. This changes the app name without changing the global Okta profile. Check the new name in Settings → Members.

Use a name from the global Okta profile
Open the user in Directory → People. Select Profile → Edit. Change the name and save.

An app override can retain the old name. Edit the user's assignment in Rox SCIM → Assignments. Click Reset beside each overridden name field, including Display name. Save to restore global profile values. Check the new name in Rox.

Add and provision a group
Open Directory → Groups → Add group. Enter a name. Click Save. Add the members. Assign the group to both Rox and Rox SCIM from each app's Assignments tab.

SCIM assignment creates the users in Settings → Members. It does not create the Rox group. Open Rox SCIM → Push Groups → Find groups by name. Select the group. Keep Push group memberships immediately checked. Click Save. After the push is Active, check Settings → User groups.

Change group membership
Open the group in Directory → Groups. Use the member controls to add people. Under Assign people, click + beside each person. Click Done. Keep the group assigned to both apps and pushed from Rox SCIM. Check users in Settings → Members and group membership in Settings → User groups.

Remove members in Okta too. Rox retains removed members until every member of the pushed group exists in Rox. Assign everyone in that group to Rox SCIM.
Remove a pushed group and its access
Open the push-status menu under Rox SCIM → Push Groups. Select Unlink pushed group. Choose Delete the group in the target app (recommended). Click Unlink. The Rox group disappears from Settings → User groups. Its user accounts remain provisioned.

To remove provisioning access, open Rox SCIM → Assignments → Groups. Click X beside the group and confirm. Check Settings → Members for deprovisioned users. Remove the group's SAML Rox assignment to revoke sign-in too. Unlinking a pushed group does not remove either app assignment.

Microsoft Entra ID
Add and provision a user
Open Users and groups → Add user/group in the Entra app used for SSO. Assign the user. Entra processes assignments in provisioning cycles. Wait for a cycle or provision on demand.
For immediate provisioning, open Provisioning → Provision on demand. Find and select the user. Click Provision. Wait for success.

Refresh Settings → Members in Rox. Check that the user appears.

Unassign and deprovision a user
In the enterprise app, open Users and groups. Select the user. Click Remove assignment. Wait for a provisioning cycle. Refresh Settings → Members in Rox. The user no longer appears.


Add and provision a group
In the same app, open Users and groups → Add user/group. Assign the group. To provision immediately, open Provisioning → Provision on demand. Find and select the group. Select up to five members at a time. Click Provision.

Refresh Settings → User groups in Rox. Assign roles to the provisioned group in Rox. Entra does not supply Rox roles.

Unassign and deprovision a group
In the enterprise app, open Users and groups. Select the group. Click Remove assignment. Check that the group disappears from Settings → User groups in Rox.
