How we built an agent that builds workflows

At Rox, we’ve spent the last few months building Agent Workflows: a new way to automate tasks on Rox, from sending pre-meeting briefs to generating detailed reports when a deal is won.
During my spring internship on the Agents team, one of my projects was building our Workflow Builder, an agent that creates these workflows. It’s gone through several iterations since its initial MVP in mid-February, and I’ll walk you through how we got it to where it is today.
Why build a workflow builder?
As we added more triggers and actions to Agent Workflows, we noticed something: the fastest way to build a workflow wasn't to use our visual editor. It was to describe what we wanted to a coding agent like Codex or Claude Code, have it generate the JSON definition, and paste it in.
Workflows have variables, conditionals, and loops. Actions have input and output schemas. We even built a debugger. In a lot of ways, building a workflow is writing code, just in a different format.
So we asked: why not build our own coding agent for Agent Workflows and put it in Rox?
The initial prototype
From the start, there were a few key UX aspects that we wanted to nail for this agent:
It should be conversational. Just like codebases, workflows can get complex and evolve over time, so it’s important that users can make follow-up edits.
It should know the capabilities of Agent Workflows well. Agent Workflows is a brand-new product, and both users and our own FDEs will need help understanding the kinds of workflows they can build. The Workflow Builder should be able to help with this.
It should be able to build complete workflows. This isn’t just a customer support chatbot. The user shouldn’t need to do anything other than tell the agent about the workflow they want.
What’s the easiest way to build something that meets these requirements? Well, our backend already keeps a registry of all the triggers and actions that we expose to our frontend. So the initial version of the Workflow Builder was simple: we just dumped the entire registry into the LLM’s system message, gave it access to an UpdateWorkflow tool, and let it crank.
Turns out, that was more than enough for simple workflows.
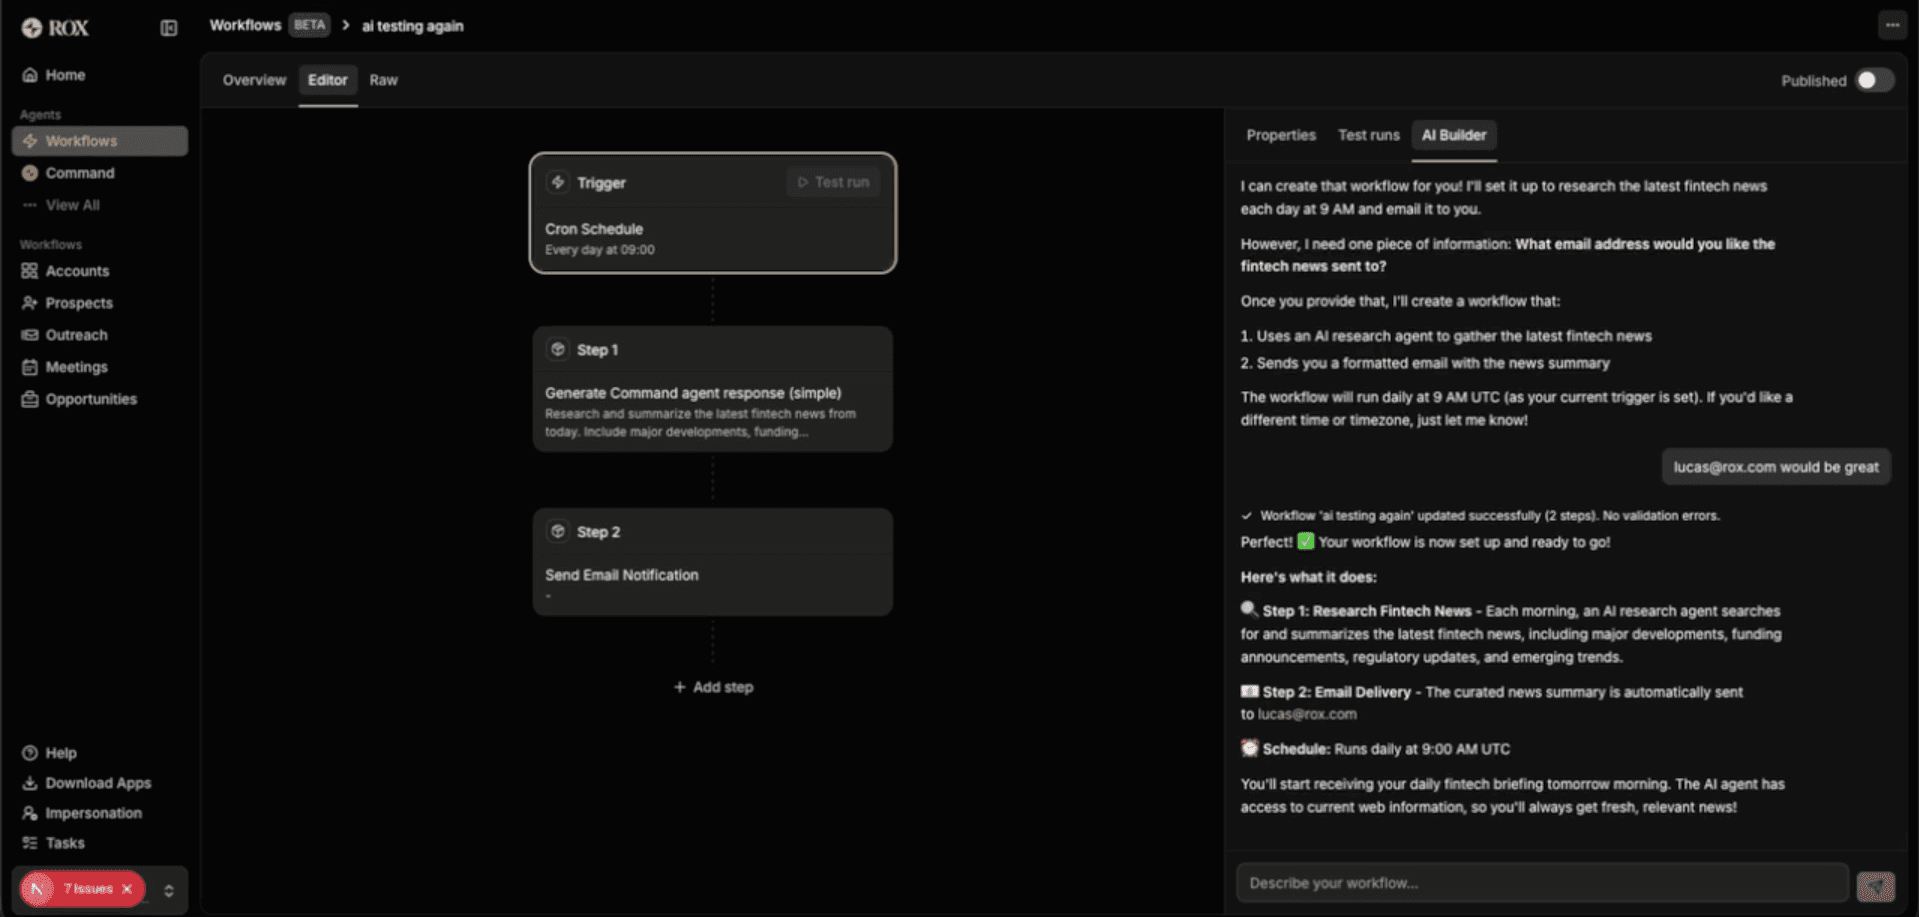
The first version of the Workflow Builder.
While the simplicity of this version was great, we noticed that performance degraded quickly when trying to build workflows with more than two or three blocks. The errors it would make were small, but they were enough to cause the entire workflow not to work as intended; things like writing Jinja templates incorrectly, mismatching types, and duplicate step names.
So once again, we turned to coding agents for inspiration.
Adding tools
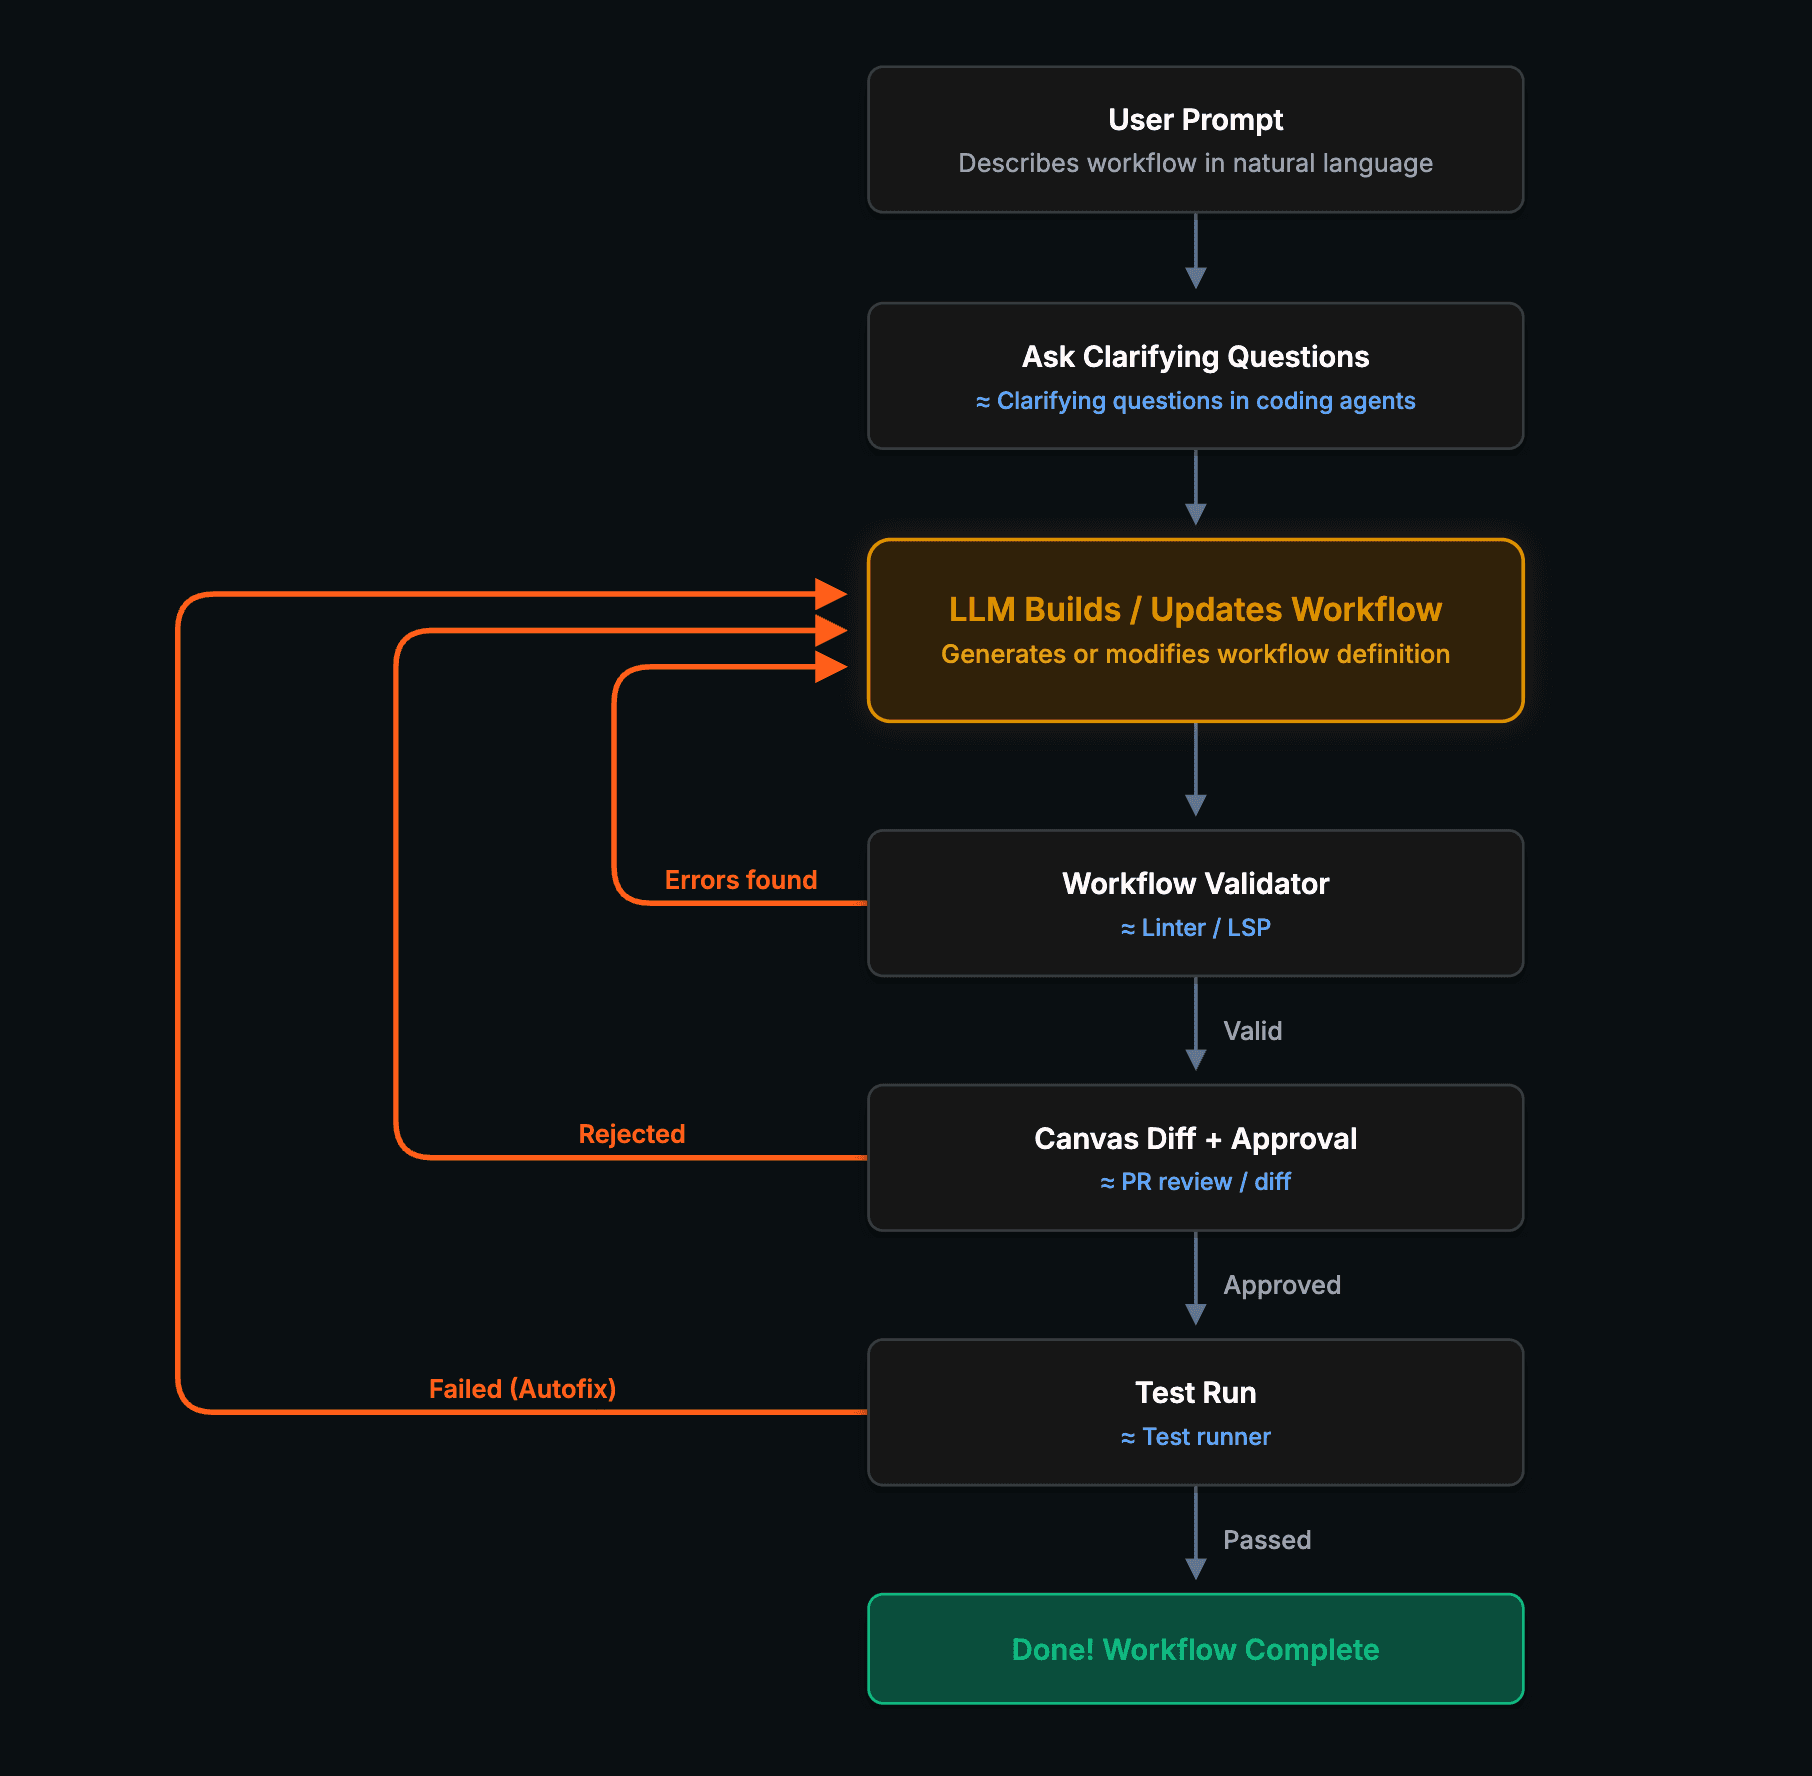
Comparing our bare-bones agent to common coding agents, we noticed some key features that we were missing:
Coding agents can self-correct: they have the ability to lint and test their code, and to correct mistakes when things go wrong.
Coding agents clarify their tasks before starting: they make sure they know what they’re building before building it, whether through a “plan mode,” the ability to ask clarifying questions, or a mix of the two.
Coding agents make their changes easy to review: coding agents display diffs as they make changes, and the full diff is reviewed as part of a PR before getting merged.
We wanted to incorporate these same ideas into the Workflow Builder, starting with the ability to self-correct. Here’s what we ended up building:
Making a feedback loop
Coding agents are significantly more effective when they can run tests and linting checks, and then self-correct. Even when a coding agent makes a mistake in its first pass while writing code, this often gets caught by tests or linting, so it can keep self-correcting until the code works as expected. We wanted the same kind of feedback loop in our Workflow Builder.
The way we did this was twofold:
Validation: We built a validation system that goes beyond “is this valid JSON” and catches things like type mismatches, invalid Jinja2 templates, duplicate variable names, and infinite loops. This is the Agent Workflows equivalent of a linter. We hooked this up to the Workflow Builder’s tools to let it know whenever the workflow it built was invalid, allowing it to self-correct before declaring its task complete.
Proposed test runs and “autofix”: We gave the Workflow Builder the ability to propose test runs with custom trigger data. Then, whenever a test run failed, we displayed an “Autofix” button in the UI that gave the Workflow Builder the run ID and told it to fix the workflow. We gave it a GetWorkflowRunDetail tool to find the details of a workflow run given a run ID, so that it could find exactly where the run failed.
Now, the user could do the Agent Workflows equivalent of vibe coding: just give the Workflow Builder a prompt, then click “save and test” and “autofix” until it works.
The Autofix button in action.
Clarifying questions
We noticed that the Workflow Builder would often dive straight into building workflows, hallucinating details or filling in missing pieces with its own assumptions. This led to workflows that technically worked but didn’t match what the user actually wanted.
The fix here was simple: many coding agents have some kind of AskClarifyingQuestions tool that they can use to make sure they understand the user’s intent completely before beginning implementation. We implemented the exact same thing here.
Interestingly, the hardest part of this feature was prompting the agent to ask clarifying questions in a way that made sense. For example, it would sometimes ask multiple clarifying questions in a single tool call, where a later question only made sense if the user answered an earlier question in a certain way, such as:
How should the report be sent?
Slack
Add to homepage
Which Slack channel should it be sent to?
#general
#sales
So in the system prompt, we provided this as a counterexample and told the agent to flatten questions like these into one question instead:
Where should the report be sent?
Email to lucas@rox.com
In the #general Slack channel
In the #sales Slack channel
Add to homepage
In general, we found that small prompting details like this, along with complete examples (including how and when to call tools), were incredibly helpful for steering the Workflow Builder’s behavior.
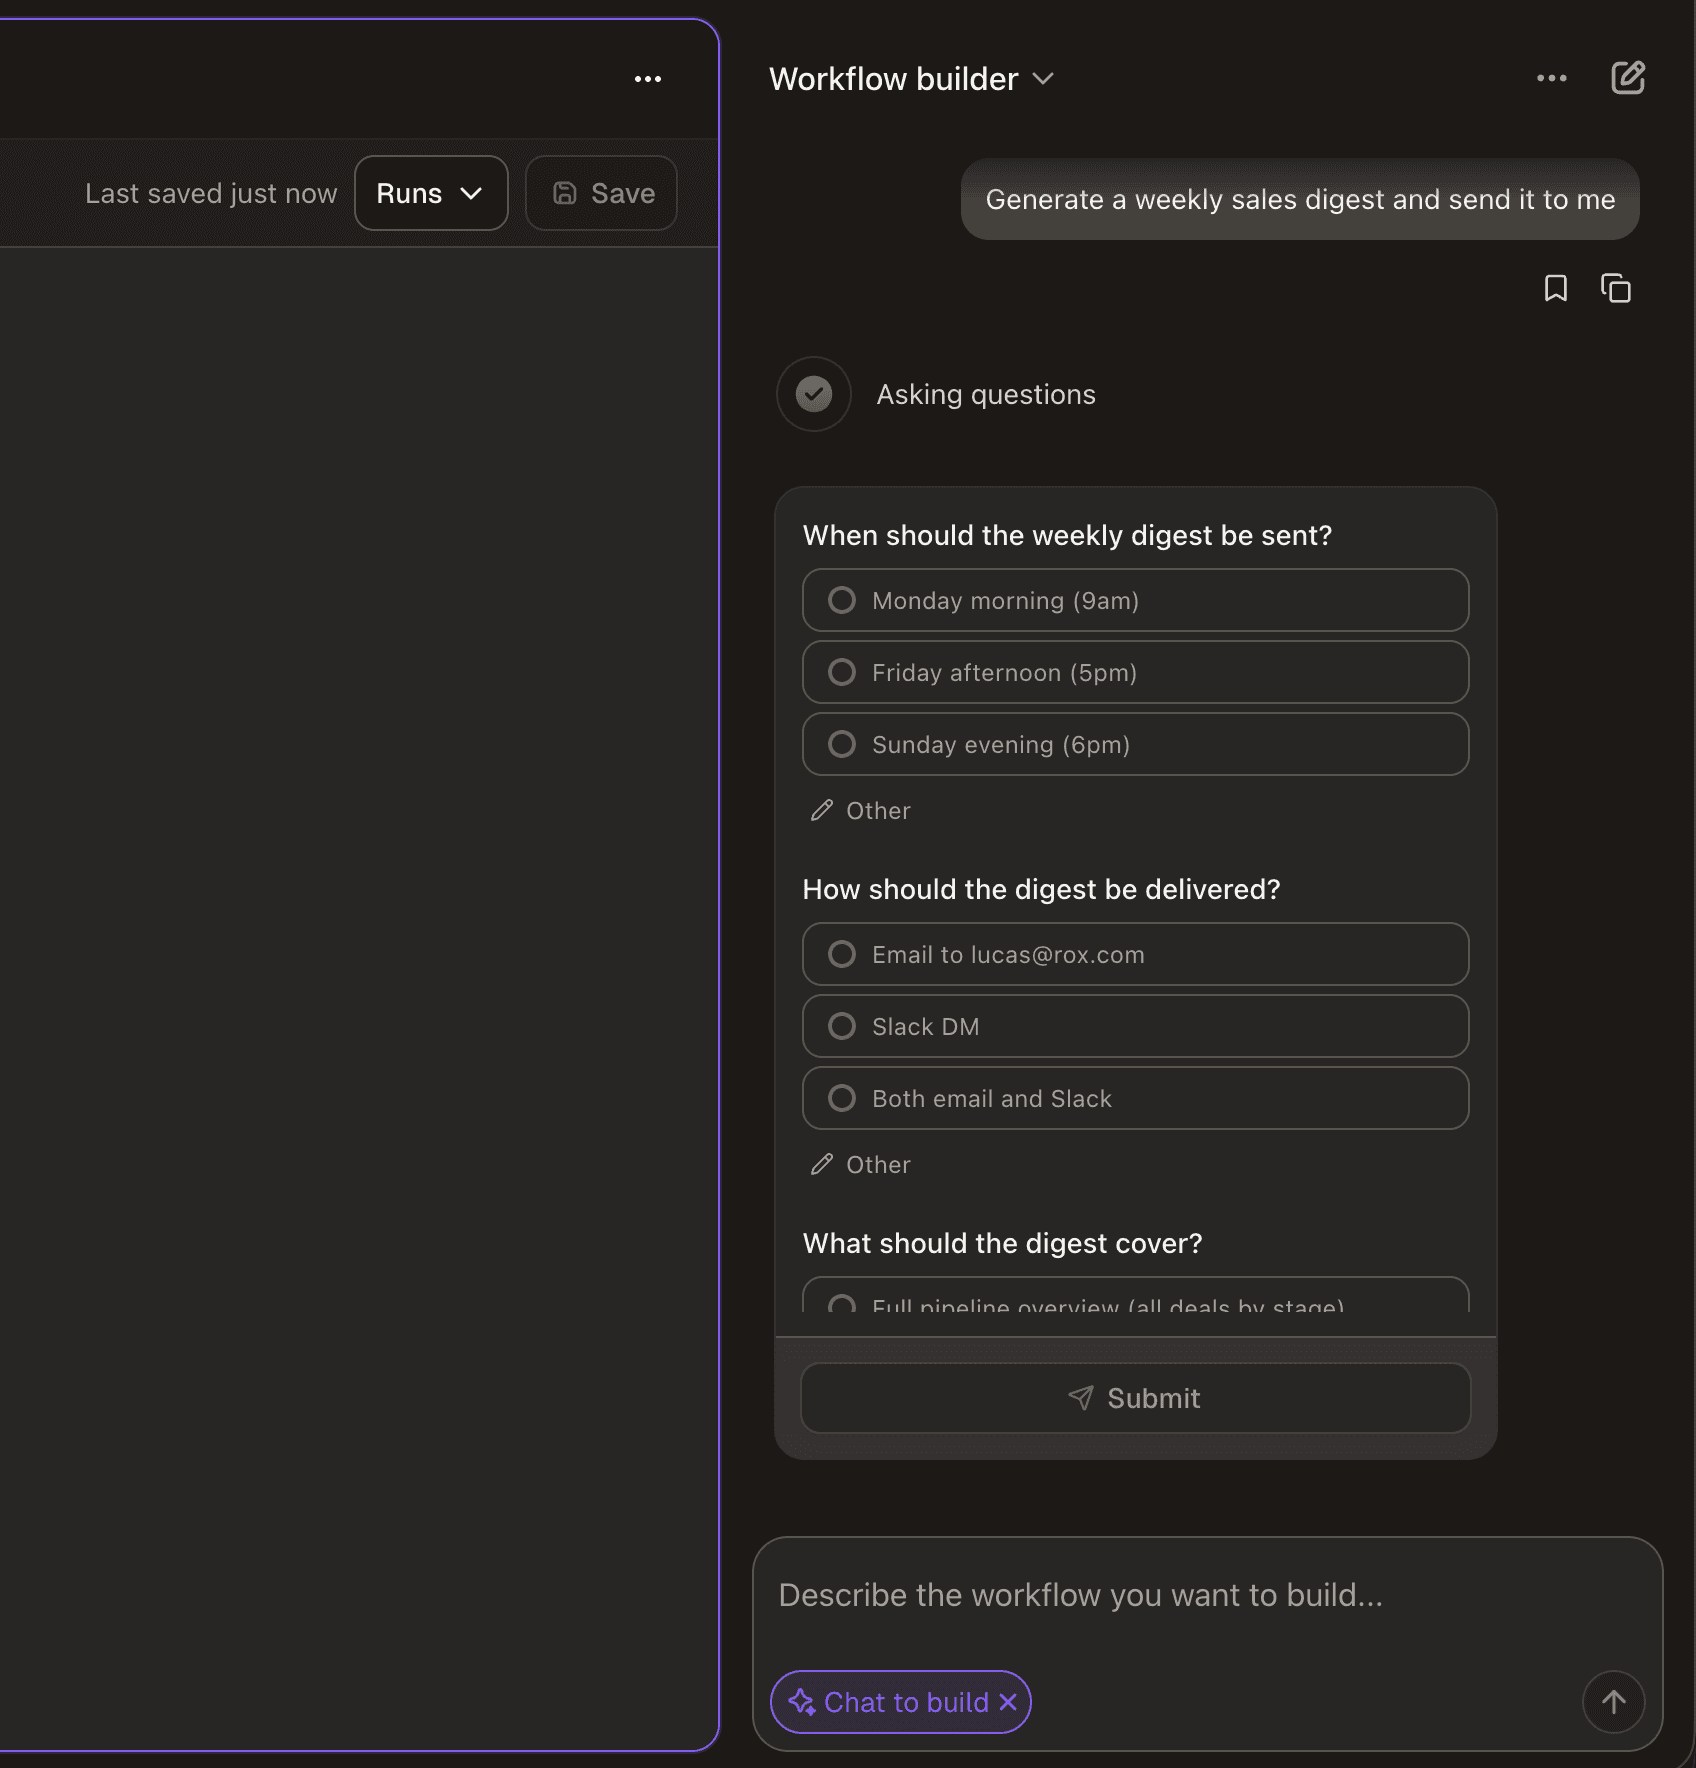
Example of the Workflow Builder asking clarifying questions before building a workflow.
Approval flow
At this point, the Workflow Builder worked well for getting a workflow 80% of the way there. However, it was still not great to use for the last 20%. One of the reasons for this was that when it made a change in a large workflow, it would save immediately, and it wouldn’t be immediately clear what exactly it had changed.
Once you have a workflow that’s more than five blocks, it’s really important to know exactly what the agent changed. If you ask the agent to modify the prompt in one workflow block, you want to make sure that it actually modified the prompt in the block you intended rather than in another one.
Again, this is a solved problem in coding agents, and more broadly, in coding in general. Every time you review a PR, you see the diff that’s going to be applied, and you must approve it before it gets merged. Some harnesses like Claude Code and Cursor even display the diffs from the agent’s changes before you make the commit.
It was clear that we needed some sort of diff UI and approval flow, but what wasn’t clear was the UX. How do you display the diff for a workflow?
The first approach was quite simple, displaying a diff summary in chat, similar to git diff --name-only. This was an improvement, and definitely better than applying changes immediately, but seeing something like “+ Added ‘Get opportunity’” wasn’t informative enough. It wasn’t clear where steps were added, and you almost had to visualize what the updated workflow would look like before seeing it in the canvas.

v1 of our approval flow. It wasn’t clear exactly which steps were being added, and it was hard to visualize what the updated workflow would look like before seeing it in the canvas.
The next approach we tried, and the one we stuck with, was displaying the diff in the workflow canvas, adding a green or yellow border to indicate additions or changes. This is similar to how Cursor and Windsurf handle this, with the coding agent on the right-hand side and the diffs displayed directly in the code.
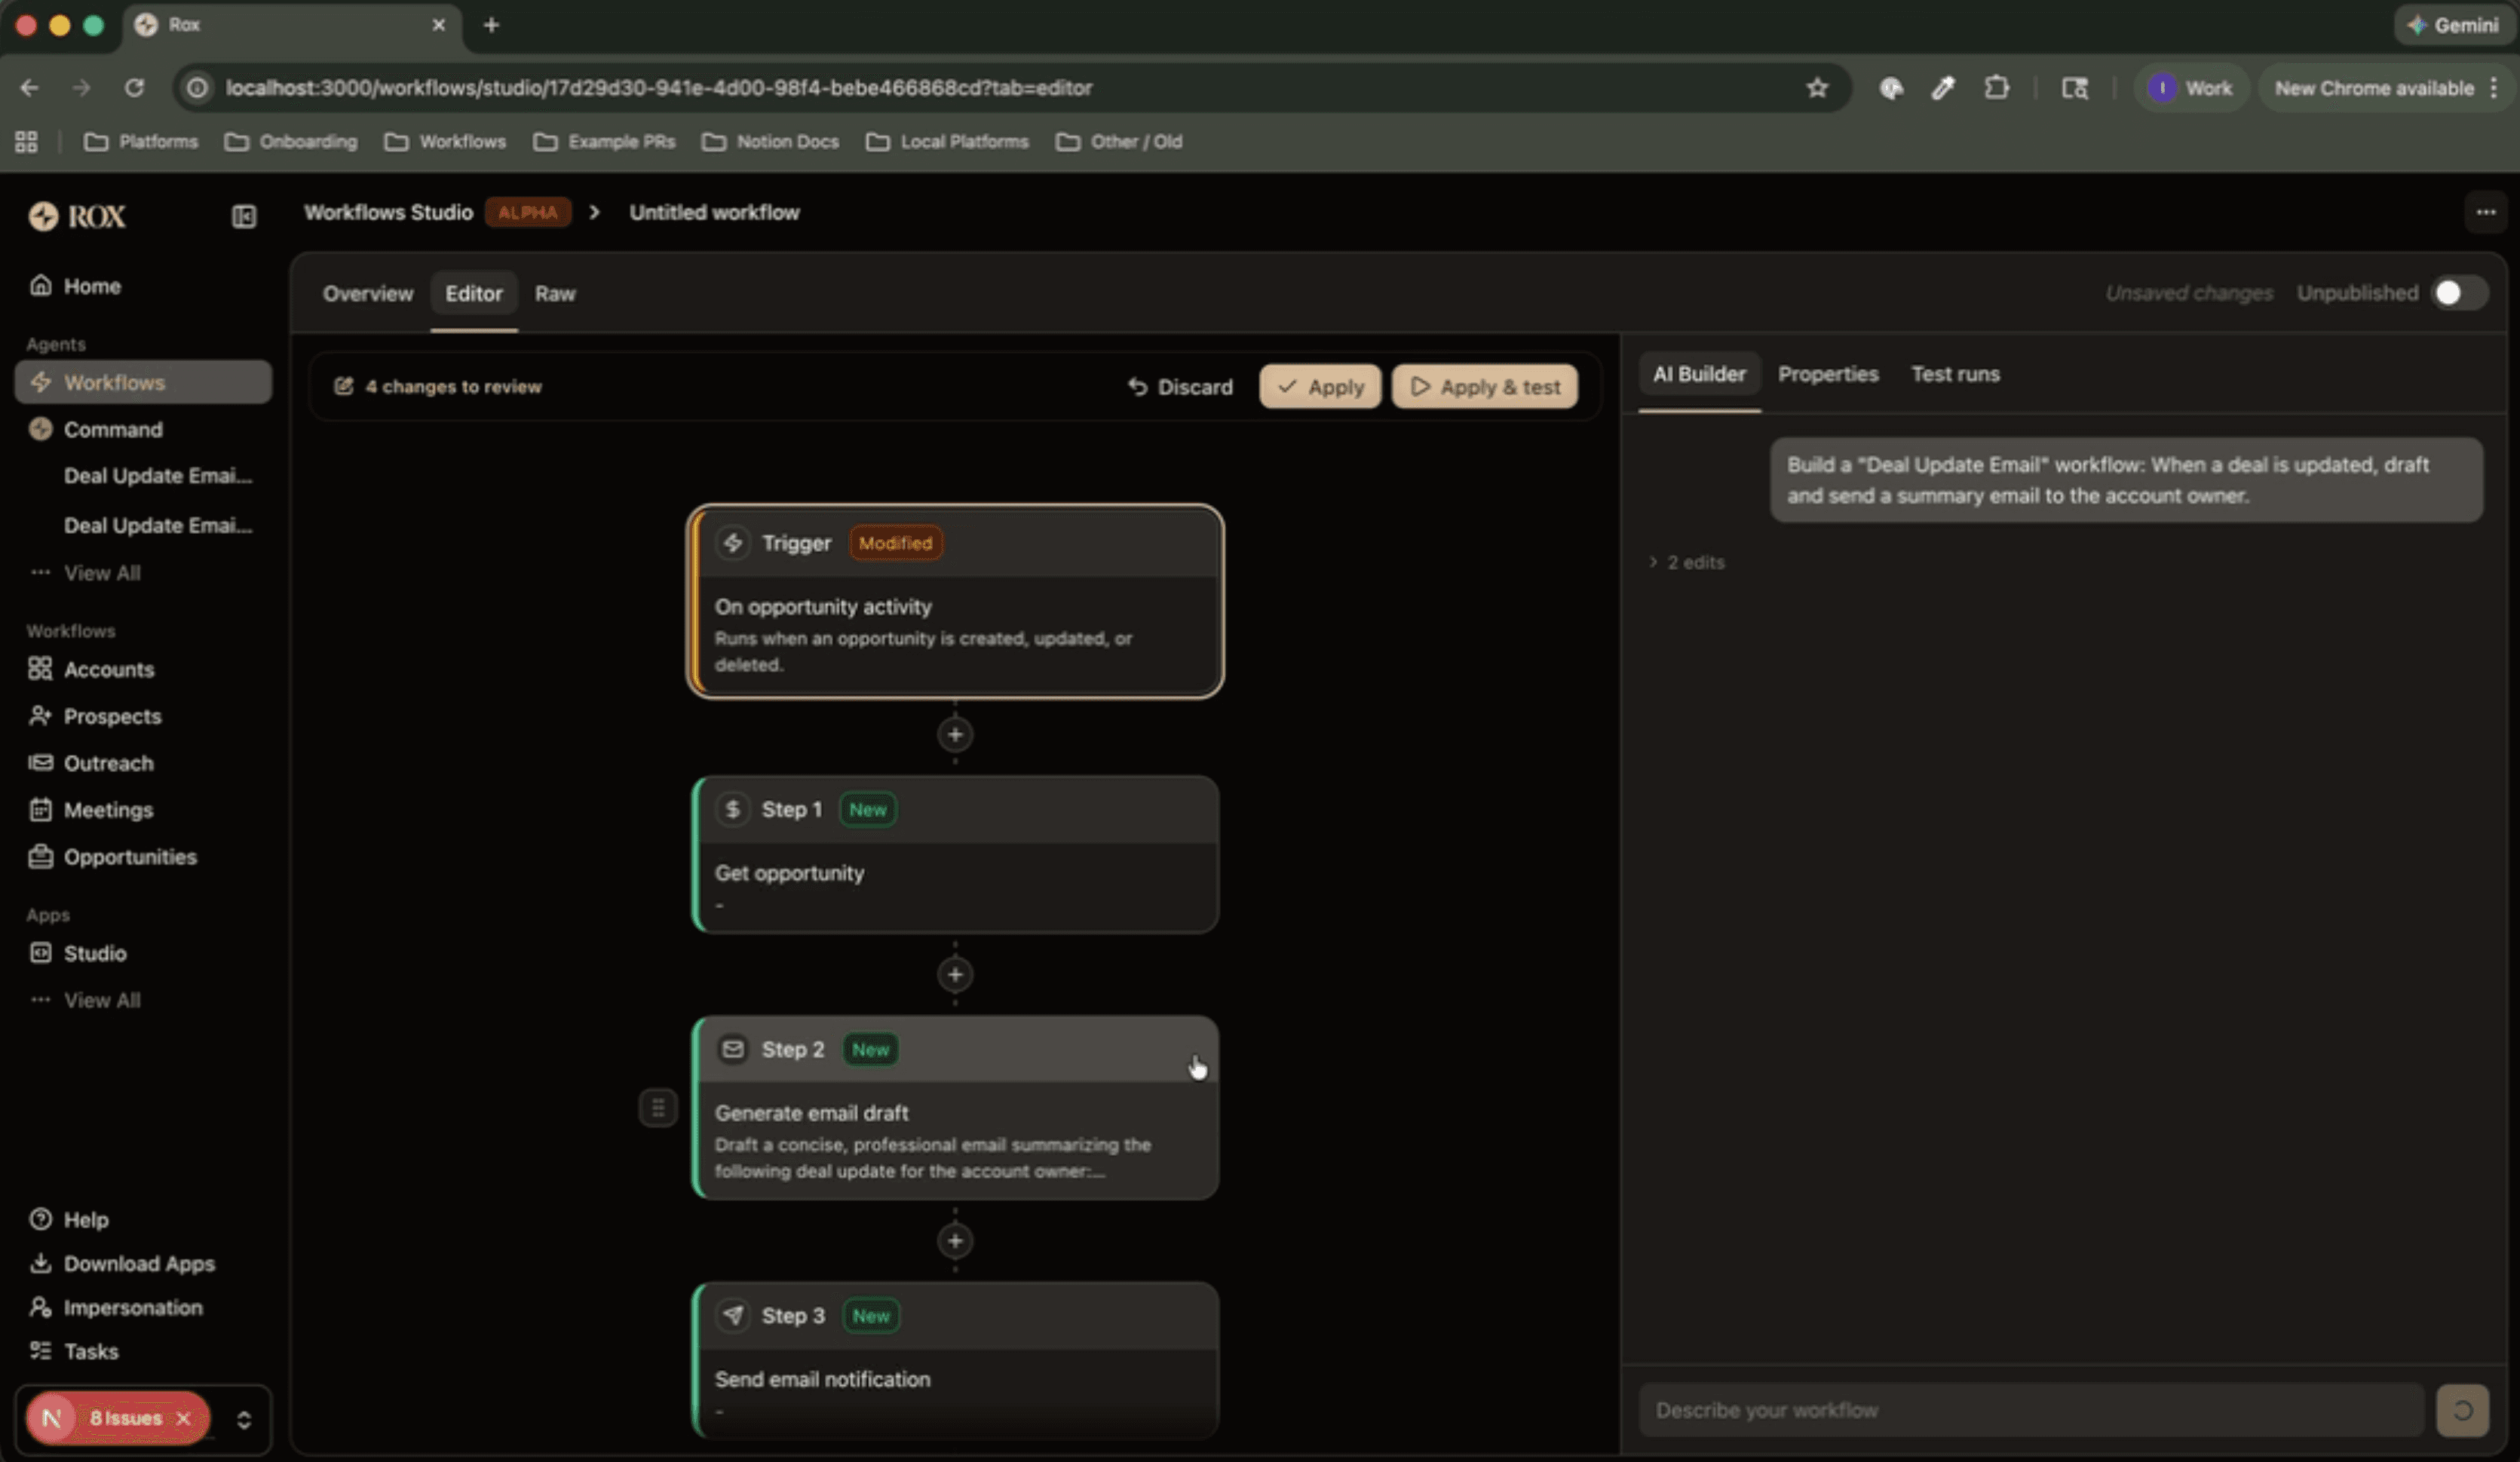
v2 of our approval flow, similar to what we have today.
This felt natural. It made it clear how the Workflow Builder’s changes fit into the pre-existing workflow, and when combined with a diff inside the properties panel, it also made it clear exactly what changed.
Conclusion
We started with a single tool and a massive system prompt, and ended up with something that feels surprisingly close to a coding agent, only for workflows instead of actual code. Many of the steps we’ve taken to this point were driven by the same question: what do coding agents get right, and how do we adapt that to workflows?
If your product involves users building structured, schema-driven artifacts, whether that’s workflows, forms, or something else, the same strategies that coding agents use transfer surprisingly well. Things like a feedback loop, asking clarifying questions, and having some sort of approval flow are patterns that generalize well beyond code.
Today, the Workflow Builder is our default flow for building Agent Workflows. But there’s still plenty of room for improvement, especially in its ability to produce more complex workflows with nested loops and conditionals, and we’re excited to keep improving it post-launch.
I’ve been working on cool projects at Rox like this throughout my internship; the ownership you get at Rox is hard to find elsewhere. If this kind of work sounds interesting to you, check out our careers page!
Similar Articles
We build with the best to make sure we exceed the highest standards and deliver real value.
